How to find and troubleshoot hidden wiring
The main causes of short-circuit wiring: damage to the insulation of current-carrying wires and device elements, their unreliable fastening and connection to each other or to grounded pipes for heating, gas and water, with housings of non-grounded devices.
An opening in the wiring circuit occurs due to breakage of the wire (especially aluminum) as a result of their frequent bending, due to corrosion of the wire, loosening of the contact clamps.
Wiring Troubleshooting Procedure
 If there is no voltage in a room, check the junction box from which the wiring goes to that room. If there is no voltage in the room, then the damage is in front of it, if there is voltage, then after it. And so until the damage is established. The most common hidden wiring malfunction is a broken wire.
If there is no phase or zero («earthing»), when searching for a defect, it is not necessary to dig out the wall, remove the coating, connect the core at the break point or insert another wire into the resulting groove, cover the groove and plaster wall surfaces during finishing works. All this is too laborious if the apartment or house is not renovated at the same time. Between repairs in the room, it is better to lay a new wire on the surface of the wall, ceiling, cornice or under them.
Removing a broken wire of hidden electrical wiring
 The following sequence of operations is observed when removing a break in the vein of hidden wiring.
The switch, outlet, and outlet are mounted vertically on the wall and are interconnected so that current flows from outlet to outlet. The lamp does not light up when the switch button is pressed. In search of the reason for the lack of incandescence, lamps are used method of elimination.
The toggle switch is left on (Fig. 1, a). The lamp is unscrewed and blindly screwed with another, preferably new one (Fig. 1, b). It is permissible to look at the lamp only at the moment of contact between the base of the lamp and the thread of the socket. Later - this is dangerous, as the flask can burst, although in most cases only its spiral burns.If the second lamp does not light up, the toggle switch is set to the «Off» position and the lamp and cartridge skirt are unscrewed. The plate contacts are then bent to the side opposite the insert. Assembly is carried out in reverse order. If there is no light again, go to the next stage.
By pressing the lock or unscrewing the screw, remove the cover or switch button. In this case, there should be dry, non-conductive material under your feet (dry wooden floor or rubber mat, etc.). Close the contacts of the switch (Fig. 1, c) with the jaws of pliers or a screwdriver, holding them by the insulated handles. The appearance of a light will prove that the switch is faulty. It changes when the panel breakers are turned off.
Sometimes they do this without disconnecting the line, standing on non-conductive material, and following other safety rules. In particular, to eliminate sparks between the contacts of the switch and the ends of the wires of the wires, remove the load from the latter, that is, replace the switch with a new one, with the keys fixed in the "Off" position. If it is difficult to determine, turn the bulb (or bulbs) inside out when the switch is connected to the chandelier.
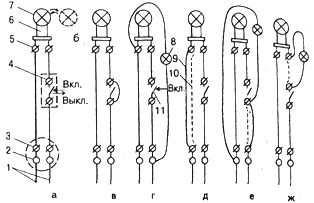
Removal of a wire break with hidden wiring: a — pressing the switch button and moving it to the «On» and «Off» positions; b — replacement of an electric lamp; c — closing the contacts of the switch and replacing it; d — check with a control lamp for the possibility of breaking the core of the wire, d — connection of the wire between the socket and the socket; e — connecting the wire between the contact and the switch; g — connection of the wire between the cartridge and the switch; 1 — conductor; 2 — socket for socket; 3 — socket contact; 4 — switching contact; 5 — cartridge contact; 6 — cartridge; 7 — electric lamp; 8 — control lamp; 9 — new wire; 10 — defective wire; 11 — toggle switch
If the lighting of the lamp spiral does not occur when the switch contacts are closed, proceed to the next stage of repair. Unscrew two screws from the socket or, if missing, from other fasteners. The cartridge hangs on the wires coming out of the hole in the socket.
The wires are checked at the point where they exit the wall. Sometimes the hole in the wall is enlarged for a quality test of the wiring. They remove the wires from the contacts of the cartridge and vibrate from the side, bending approximately 90 ° (the elastic plastic sheath-insulation hides the break in the core).
The suspicious location of the wire is monitored in two ways. Since the wires are connected to the socket from the socket, use a control lamp or a multimeter (Fig. 1, d).
Place one "control" of the probe in each socket of the socket, the other is applied to the end of one or the other core. The switch is left on.If the test lamp does not light up, then the probe is rearranged to the end of the other core. The wiring is hidden, and therefore it is difficult to immediately guess which wire the probe should be pressed against. The probe from one socket of the socket is rearranged into another socket. The test lamp will light up only when its probes touch opposite poles (phase and "ground"), that is, different solid wires of the wiring. If the control lamp does not light up, there is a break in the core.
It often happens that the place of breakage near the wire is in the groove, where no one touches it. It is possible that a partial break of the core was still during its laying and the electrical load on the wire aggravated the defect, or the core was accidentally broken with a nail or torn by a drill of an electric drill. There is nothing dangerous if one stands on conductive material and without rubber gloves. Test-lamp probes, which need to touch only the right places without breaking unnecessary ones, pose less of a threat. Metal wires, pins or pins protruding from the insulation of the probe by only 1-1.5 mm serve as a guarantee.
There is another way to check the wire. At the point of exit from the wall with a sharp knife at the supposed place near the wire, the insulation is cut in the longitudinal direction by 7-12 cm to see the core. Such a cut will weaken its elasticity so much that breaking the core will cause the insulation to sag under vibration. If the incision does not reveal a fracture, it is carefully wrapped with insulating tape.
It is possible that the test lamp does not flash after checking at least one wire.The flow of electric current is stopped by turning off the power supply at the apartment panel. The interruption of the electric current is checked by switching on a chandelier, candlestick or indicator.
The core of the defective wire is already disconnected from the cartridge, and its other end is, for example, at the outlet. By unscrewing the socket contact screw, loosen the core clamp and remove it. This end of the core is used and placed on the side. A new passage, which will replace the defective one in the furrow, is chosen a little longer than the hidden one. In this case, it is preferable to use a stranded wire that will never break.
The ends of the core or core in a stranded wire are freed from insulation 10-15 mm long, bent into loops or left straight and tightened in contacts. If the lamp is unscrewed from the socket, it returns to its place. Turn on the circuit breakers on the apartment panel. The lamp should light up when the switch is in the correct position. Current power has been temporarily interrupted again. The cartridge is attached with screws to a socket or to dowels. The covers of the socket and the switch are returned to their original places so that they press the new wire stretched along the wall (Fig. 1, e).
The lamp in the outlet does not flash after changing one wire between the socket and the socket. The defect may be in the wire between the switch and the contact, or the switch and the contact, or both wires with kinks. Once again, diagnose the malfunction of the warning lamp. Remove the switch cover and contact. One test lamp probe is inserted into the socket socket and the other is attached to the switch contact.
If the test lamp does not respond, the second probe is left in the same position, and the first is placed in another socket of the socket. The lamp does not flash again. Now the second probe touches the second contact of the switch. If the lamp still does not light, then the first probe is moved to another socket of the socket (Fig. 1, e).
The absence of light in the control lamp indicates a broken wire between the switch and the outlet. A new wire is selected and prepared in the same way as in the previous step. The only question is between which switch contact and socket socket to tighten it.
If a wire is changed between one of the receptacle sockets and the socket contact, then that wire is connected to another socket contact and to each contact of the switch. But the wire between the socket socket and the socket contact may be intact. After that, with the help of a control lamp, the places of its connection in the outlet and outlet are determined.
The wire between the switch and the cartridge is the last place of possible breakage in the core (Fig. 1, g). Checking the test lamp probes is not necessary here. A probe is applied to this socket contact that does not press the wire strand pointing directly to the output.
The second probe touches the remaining contact of the switch, since one contact is already occupied by the live wire from the socket contact. In this case, the switch button must be in such a position that the intermediate parts of the switch close their contacts.
The presence of dim light in series connected lamps when the breakers are on will confirm a core break. Disconnect the wiring again.The ends of the core of the defective hidden wire are removed from under the contacts of the cartridge and the switch and then insulated.
The new wire is taken and prepared as before. The ends of the core of this wire are crimped into the free contacts of the switch and holder. Turn on the circuit breakers. The lamp in the socket should light up. The power goes off again. The cartridge is attached to the socket so that only new wire comes out of the base. The remaining ends from pulling this wire along the wall are hidden under the switch cover or under the base of the cartridge. They supply current to the electrical network of the apartment.
Gorbov A. M. Modern renovation of apartments and houses