Disassembly and assembly of electric motors for repair
 Procedure for disassembling electric motors
The procedure for disassembling the electric motor during repair is as follows:
1. Remove the pulley or clutch half.
2. Remove the caps of the rolling bearings, release the clamps for the traverse, unscrew the nuts from the studs, tightening the flanges of the ball bearings.
3. The oil is drained from the sliding bearings.
4. Remove the end shields.
5. Remove the motor rotor.
6. Remove the rolling bearings from the shaft, pull the bushings or plain bearing shells from the shields.
7. Rinse shields, bearings, cross members, bushings, grease fittings, seals, etc. With gasoline or kerosene.
8. Clean the coils of dust or blow them with purified compressed air.
9. After cleaning the dirty coils, wipe with a clean cloth soaked in gasoline.
10. Desolder the connections and remove the coils from the slots.
 The disassembly of the electric motor must be done so as not to damage individual parts.Therefore, during disassembly, the use of too much effort, sharp blows or chisels is not allowed.
Tightly turning bolts are moistened with kerosene and left for several hours, after which the bolts are loosened and unscrewed.
When disassembling the electric motor, all small parts are placed in a special box. Each part of the electric motor must have a label indicating the number of the repaired electric motor. It is better to screw the bolts and screws in place after disassembly, which will prevent their possible loss.
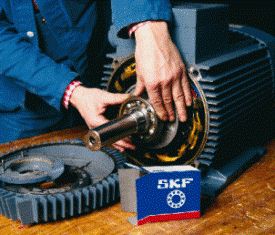
The roller, clutch half and ball bearing are removed from the shaft using a tie. (Fig. 1). It is desirable that the screed has three clamps.
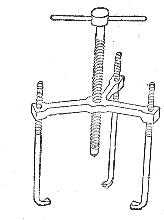 Rice. 1. Link for disassembling electric motors
The end of the connecting bolt rests against the end of the motor shaft, and the ends of the clamps catch the edges of the pulley, clutch or inner bearing. As the bolt is turned, the part to be removed slides off the motor shaft. In this case, it is necessary to ensure that the direction of the force coincides with the axis of the shaft, because otherwise a mismatch is possible, which will damage the tube of the shaft of the electric motor.
If there is no such connection, the washer or bearing is removed from the motor shaft by tapping lightly with a hammer through a hardwood or copper gasket. Impacts are applied to the roller hub or the inner ring of the rolling bearing uniformly over the entire circumference.
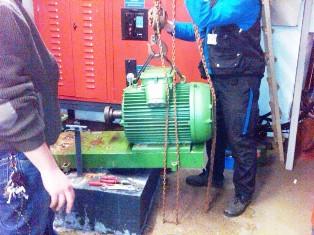
To remove the motor end shield, unscrew the bolts and gently blow a hammer through the seal on the protruding edges of the shield to separate it from the body.In order to avoid damage when disassembling large electric motors, the rotor of the electric motor and the shield must be suspended during disassembly, which is usually carried out with the help of special lifting means (hoists, hoists, etc.).
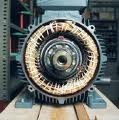
A cardboard gasket of sufficient thickness is placed in the gap between the rotor and the stator of the electric motor, on which the rotor stops when it is removed. This will prevent possible damage to the insulation of the motor windings.
When disassembling small electric motors, the rotor is removed by hand. At one end of the shaft, wrapped in cardboard, a long tube is placed, with the help of which the rotor is carefully removed from the stator hole, keeping it all the time in weight.
When repairing journal bearings, it is necessary to remove the dense sleeve or liner from their bearing shield by striking with a wooden hammer through a wooden groove. In this case, the shield must be placed so that the bearing rests on this support. Otherwise, the bearing may crack. Care must also be taken not to damage the oil rings.
 Engine assembly
Electric motor assembly procedure
The assembly of the electric motor begins with the assembly of individual blocks. Recast liners or inverted bushings are pressed into the end shields. First they must be smoothed on the shaft and cut into them according to the old dimensions for lubrication grooves and grooves for lubrication rings.
Bushings and bushings are pressed into the shield using a small screw or hydraulic press, or by tapping lightly with a hammer through the seal.During these assembly operations, distortions are particularly dangerous, which can lead to the seizure of bushings and bushings.
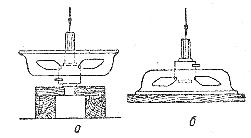
Rice. 2. Installation of the bearing shield of the electric motor when the insert is knocked out: a — correct, b — incorrect.
The ball bearings must be firmly seated on the shaft. To facilitate this operation, the bearing is heated in an oil bath to a temperature of 70 — 75 °. This expands the bearing and mounts more easily on the motor shaft. When heating the bearing, it is not recommended to place it on the bottom of the tub, but rather to hang it on a wire. It is not recommended to heat the bearing in a blowtorch flame to prevent hardening of the bearing steel.
The bearing is placed on the motor shaft by light taps with a hammer on the tube attached to the inner ring of the bearing. During further assembly, the outer bearing should fit normally into the seat of the end shield. Too tight a fit can cause the balls to be pinched, and a loose fit will cause the outer bearing frame to rotate in the shield seat, which is unacceptable.
The next operation, the introduction of the rotor into the stator hole, is carried out in the same way as during disassembly. The end shields are then installed and are temporarily bolted in place. In this case, it is necessary to install the shields in their old place, which is checked by the coincidence of the markings applied to the body and the shield during disassembly.
When placing the shields on the motor shaft, the bearing grease rings must be raised, otherwise they may be damaged by the shaft.
After installing the shields, the rotor of the electric motor is turned manually. The rotor of a properly assembled electric motor should turn relatively easily.
Tight rotation of the electric motor shaft can be caused by: incorrect placement of the rolling bearing on the shaft (small radial clearance), insufficient peeling of the bushing or sleeve of the bearing bush, the presence of sawdust, dirt, dried oil in the bearing, deviations of the shaft , shaft or housing machining that does not fit, increased friction of leather or felt seals on the shaft.
After this, the bolts of the end shields are finally tightened, the rolling bearings are filled with the appropriate grease and covered with caps. The oil is poured into the sliding bearings.
The rotor of the assembled electric motor is turned again by hand, the absence of friction of the rotating parts with the stationary ones is checked, the required take-off stroke (axial displacement of the rotor) is determined and adjusted.
After assembly, the electric motor is connected to the network and checked during idle operation, after which it proceeds to final tests.