Installation of pre-assembled electric motors
When installing electric motors, they are guided by PUEand the manufacturer's instructions.
Checking the foundation when installing electric motors
One of the main preparatory operations before starting the installation is checking the foundation. Check the concrete, the basic axial dimensions and heights of the bearing surfaces, the axial dimensions between the anchor bolt holes, the depth of the holes and the dimensions of the niches in the foundation walls.
Preparation of electric motors for installation
Electric motors delivered in an assembled state are not disassembled at the installation site if they are transported and stored correctly.
The preparation of such machines for installation includes the following technical operations:
-
visual inspection;
-
cleaning foundation plates and bed legs;
-
washing foundation bolts with white spirit and checking the quality of the thread (running nuts);
-
checking wires, brush mechanism, collectors and slip rings;
-
checking the condition of the bearings;
-
checking the clearances between the cover and bearing sleeve, the shaft and the bearing seal, measuring the clearances between the bearing sleeve and the shaft;
-
checking the air gap between the active part of the rotor and the steel of the stator;
-
checking the free rotation of the rotor and the absence of fans touching the covers; check with a megometer the insulation resistance of all windings, the brush and the insulated bearings.
 The electric motors are checked on the stand in a specially designated room in the workshop.
The electrician notifies the foreman, the foreman or the head of the installation about the detected defects.
If no external damage is found, the electric motor is blown with compressed air. In this case, first check the supply of dry air through the pipeline; for this, the air flow is directed to some surface. When blowing, the rotor of the electric motor is turned manually, checking the free rotation of the shaft in the bearings. The outside of the engine is wiped with a rag dipped in kerosene.
Flush the bearings before installing the motor
 Flushing the bearing bearings during assembly is carried out as follows. The remaining oil is removed from the bearings by unscrewing the drain plugs. Then, screwing them, kerosene is poured into the bearings and the armature or rotor is turned by hand. Then unscrew the drain plugs and let all the kerosene drain. After rinsing the bearings with kerosene, they should be rinsed with oil, which carries out the rest of the kerosene. Only then are they filled with fresh oil. 1/2 or 1/3 volume bathroom.
The lubrication in the rolling bearings does not change during the assembly of the machines.Do not fill the bearing with grease 2/3 of the free volume of the bearing.
Measuring the insulation resistance of an electric motor before assembly
The measurement of the insulation resistance of DC motors is carried out between the armature and the excitation coils, the insulation resistance of the armature, brushes and excitation coils is checked in relation to the housing. If the electric motor is connected to the network, then when measuring the insulation, it is necessary to disconnect all the wires connected to the electric motor from the network and the rheostat. During the measurement, an insulating gasket of micanite, electrical cardboard, etc. is placed between the brushes and the collector.
A three-phase squirrel-cage motor is measured for the insulation resistance of only the stator windings relative to each other and to the frame. This can only be done if all 6 coil ends are removed. If only 3 ends of the windings are taken out, then the measurement is made only relative to the case.
For electric motors with a wound rotor, the insulation resistance between the rotor and the stator is additionally measured, as well as the insulation resistance of the brushes relative to the body (insulation gaskets must be placed between the brushes.)
The insulation of the windings of electric motors is measured with a 1 kV megohmmeter for machines with a voltage up to 1 kV, and for electric motors with a voltage above 1 kV with a 2.5 kV megohmmeter. If the results of insulation resistance measurements meet the standards, then those electric motors can be turned on without drying out the insulation of the windings. Such electric motors are delivered to the installation site and installed on site.
Installation of electric motors
Lifting of an electric motor weighing up to 50 kg can be done manually when installed on low bases.
Connecting electric motors to the mechanism
The connection of electric motors to the mechanism is carried out using couplings or through a transmission (gear, belt). For all connection methods, it is necessary to check the position of the engine with a level in the horizontal plane in two mutually perpendicular directions. For this, it is most convenient to use the «gross» level, since this level has a depression in the base in the form of a «swallow tail»; it is convenient to put it directly on the electric motor shaft.
Electric motors installed directly on a concrete floor or foundation are calibrated by placing metal motor pads under the feet to adjust them in the horizontal plane. Wood gaskets are not suitable. they swell when the foundation is poured and knock down the alignment made, and when the bolts are tightened, they compress.
In the case of belt drives, the parallelism of the shafts of the electric motor and the mechanism rotated by it must be observed, as well as the coincidence of the middle lines along the width of the rollers. If the width of the rollers is the same, and the distance between the centers of the shafts does not exceed 1.5 m, alignment is carried out using a steel press.
To do this, the line is applied to the ends of the rollers and an electric motor is adjusted so that the ruler touches the two rollers at 4 points. If the distance between the centers of the shafts is more than 1.5 m and there is no ruler for alignment, then alignment in this case is carried out using a sack and clamps mounted on the rollers.The centers of the shafts are adjusted to achieve the same distance from the clamps to the thread. Alignment can also be done with a thin cord.
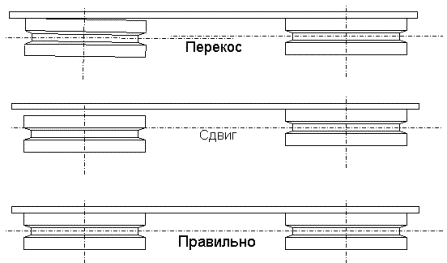
Alignment of motor shafts during assembly
The alignment of the shafts of the connected electric motors and mechanisms is carried out to eliminate their lateral and angular displacements.
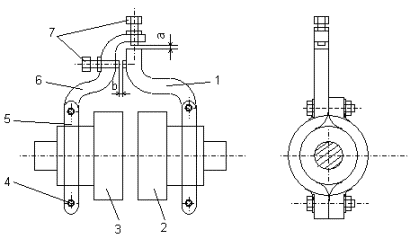
In installation practice, radial-axial clamps are most often used for this. Before centering, the half-couplings are disengaged and the shafts are moved apart so that the clamps and half-couplings do not touch. The design of radial-axial clamps is shown in Fig. The outer clamp 6 is fixed with a clamp 5 on the hub of the half-coupler 3 of the installed machine, and the inner clamp 1 is fixed with the same clamp on the hub of the half-coupler 2 of the connected machine. The connection of the brackets to the brackets is carried out by means of bolts 4 with nuts. Using the measuring bolts 7, set the minimum clearances a and b
During the alignment process, measure lateral a and angular x clearances using feelers, dial gauges, or micrometers. The indicator or micrometric head is placed in place of the bolts 7. When measuring with a probe, its plates are inserted into the gap with noticeable friction to a depth of 20 mm. When measuring with a probe, errors are possible, which depend on the person who makes these measurements, on his experience. The results of the measurements are monitored. To do this, the rotations of the shafts and measurements are repeated.
For correct measurements, the sum of the numerical values of the even measurements must be equal to the sum of the numerical values of the odd measurements: a1 + a3 = a2 + a4 and b1 + b3 = b2 + b4
° Consider that the measurements have been made correctly if the difference between these quantities does not exceed 0.03 — 0.04 mm. Otherwise, the measurements are repeated more carefully.
Evenly tighten the foundation bolt nuts with standard spanners without extensions in two to three turns in the required sequence. They start with the foundation bolts located along the axes of symmetry of the bearing part, then the bolts closest to them are tightened, and then, gradually moving away from the axis of symmetry, the others.