Basic properties of metals and alloys
 Iron alloys called steels, as well as alloys based on aluminum, copper, titanium, magnesium and some other non-ferrous metals, are widely used today. All these alloys under normal conditions are hard, their structure is crystalline, therefore their characteristics are high strength, as well as fairly good thermal conductivity and electrical conductivity.
The physical properties of alloys and metals include: density, specific heat, thermal conductivity, thermal expansion, electrical conductivity, electrical resistance, as well as mechanical characteristics that determine the ability of an alloy or pure metal to withstand deforming loads and fracture.
If the main physical properties of alloys and alloys are measured quite simply, then the mechanical characteristics are determined by special tests. The specimen under laboratory conditions is subjected to shear, tension, compression, torsion, bending or the combined action of these loads. These loads can be both static and dynamic. With static loading, the effect grows slowly, with dynamic loading, quickly.
Depending on the conditions under which a part is intended to work, a certain type of mechanical testing is assigned, at room, low or high temperature. The main mechanical characteristics are: hardness, strength, strength, plasticity and elasticity.
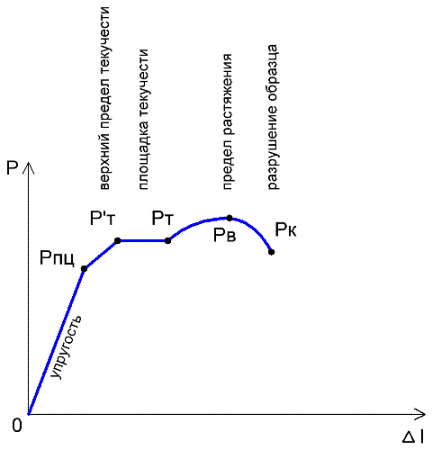
Most of the strength indicators are determined by static tensile tests of samples using a tensile machine in accordance with GOST 1497-73, when the tensile diagram is automatically recorded during the tests.

A typical chart allows you to estimate the modulus of normal elasticity, the maximum stress up to which stretching occurs linearly, the yield strength, the yield strength, and the tensile strength.
The ability of an alloy or metal to deform without breaking is called ductility. As stretching progresses, the relative elongation and shrinkage of the sample are evaluated, which are interrelated because the cross-sectional area of the sample decreases during stretching. The percentage is determined by the ratio of the increase in the length of the sample after breaking to the original length, this is the relative elongation σ. The relative shrinkage ψ is measured in a similar way.
The strength of the alloy makes it possible to evaluate the impact tests, when the notched sample is subjected to impact, for this, a mahalometer is used. Impact resistance is determined by the ratio of the work spent on breaking to the cross-sectional area of the specimen in the notch.

Hardness is determined in two ways: Brinell HB and Rockwell HRC. In the first case, a hardened steel ball with a diameter of 10, 2.5 or 5 mm is pressed against the sample and the force and area of the resulting hole are correlated.In the second case, a diamond cone with a tip angle of 120 ° is pressed. So, the hardness determines the resistance of the alloy to the indentations of harder bodies in it.
When it is necessary to determine the suitability of an alloy for forging and hot forging, deformation and ductility tests are carried out. Some alloys are better forged in the cold state (for example, steel), others (for example, aluminum) — in the cold.
Often the tests are carried out taking into account the method of the upcoming pressure treatment of the alloy. For cold and hot position, they are tested for disorder, for bending - they are tested for bending, for stamping - for hardness, etc. If a technological process is being developed, then the combination of these mechanical, physical and technological properties of the metal or alloy is taken into account.
