Why should the LED be connected through a resistor
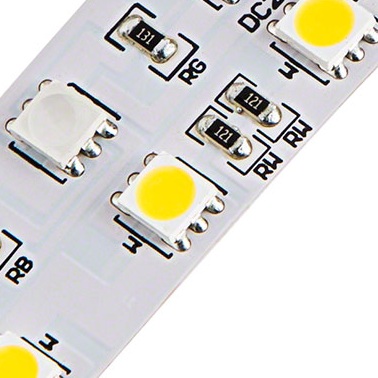
The LED strip has resistors, PCBs (where LEDs serve as indicators) have resistors, even LED bulbs — and that's resistors. What is the problem? Why is an LED usually connected through a resistor? What is a resistor for an LED?
In fact, everything is very simple: An LED needs very little DC voltage to operate and if you apply more the LED will burn out. Even if you apply a little more, 0.2 volts more than the nominal, the LED resource will already begin to rapidly decrease, and very soon the life of this semiconductor light source will end with tears.
For example, a red LED needs exactly 2.0 volts for normal operation, while its current consumption is 20 milliamps. And if you apply 2.2 volts, there will be a breakdown of the p-n junction.
For different LED manufacturers, depending on the semiconductors used and the LED technology, the operating voltage may differ slightly in one direction or the other. However, look at the current-voltage characteristic of a red SMD LED from a well-known manufacturer, for example:
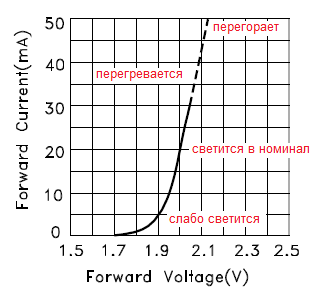
Here you can see that already at 1.9 volts, the LED starts to glow dimly, and when exactly 2 volts are applied to its outputs, the glow will turn out to be quite bright, this is its nominal mode. If we now increase the voltage to 2.1 volts, the LED will start to overheat and quickly lose its resource. And when more than 2.1 volts are applied, the LED will burn.
Now let's remember Ohm's law for a section of a circuit: the current in the circuit section is directly proportional to the voltage at the ends of this section and inversely proportional to its resistance:

Therefore, if we have a current through the LED equal to 20 mA with a voltage across its terminals of 2.0 V, then which LED has a resistance in action, based on this law? Correct: 2.0 / 0.020 = 100 ohms. The LED in working condition is equivalent in its characteristics to a 100 ohm resistor with a power of 2 * 0.020 = 40 mW.
But what if there is only 5 volts or 12 volts on board? How to power an LED with such a high voltage so that it does not burn out? Here are the developers everywhere and decided that it is most convenient to use additionally resistor.

Why a resistor? Because it is the most profitable, the most economical, the cheapest in terms of resources and power dissipation, the way to solve the problem of limiting the current through the LED.
So if there is 5 volts available and you need to get 2 volts across a 100 ohm «resistor», then you need to divide that 5 volts between our useful 100 ohm glow resistor (which is this LED) and another resistor, the nominal value, of which now needs to be calculated based on what is available:
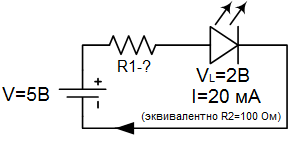
In this circuit, the current is constant, not variable, all the elements are linear in steady state, therefore the current in the whole circuit will be the same value, in our example 20 mA - this is what the LED needs. Therefore, we will choose a resistor R1 with such a value that the current through it will also be 20 mA, and the voltage on it will have only 3 volts, which must be put somewhere.
So: according to Ohm's law I = U / R, therefore R = U / I = 3 / 0.02 = 150 Ohms. And what about strength? P = U2/ R = 9/150 = 60 mW. A 0.125W resistor is fine so it doesn't get too hot. Now it is clear to everyone what the resistor for the LED is.
See also: LED specifications