How to properly crimp insulated lugs
Recommendations for crimping insulated terminals with KBT crimping tools
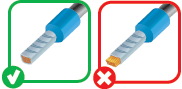
1 Prepare the wire properly. Insulated connectors can only be crimped on stranded copper conductors. For the installation of solid wires, use non-insulated lugs and special crimping dies (type 05). Strip the insulation from the wire to the required length without damaging the wires. The removal length is determined by the coupling geometry. To facilitate the insertion of the stranded wire into the ear, twist the wire slightly to make it compact.
2 Select the correct connector. The size of the lug must correspond to the cross section of the wire.
The geometry of the contact part is selected according to the type of input terminal and operating conditions. When vibrating or in rolling stock, do not use fork tips.


3 Choose the right tool… Use a professional crimping tool. Ratcheting pliers provide a stop until a full crimp cycle is completed.This eliminates the risk of under pressure caused by the operator. The graph shows the dependence of the mechanical strength and electrical resistance of the contact on the crimp force (the height of the crimp profile).
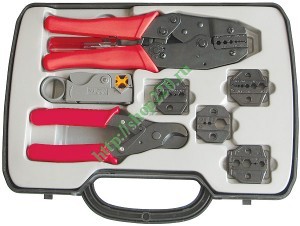
4 Place the dies correctly on the jaws... When changing dies in crimping jaws, mount them so that the side of the dies with the smallest part of the crimp profile is on the edge of the jaws.
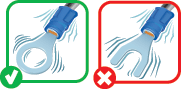
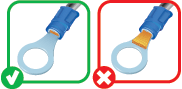
5 Place the ferrule correctly on the core... The end of the exposed core must be visible and flush with the lug crimp or protrude no more than 1mm without entering the contact area of the connection. Make sure that there is no insulation on the individual conductors of the core under the insulated sleeve. The wire insulation must go inside the pin insulation sleeve up to the stop and completely overlap the sleeve.
6 Insert the connector correctly into the jaw dies. When crimping with two-circuit dies (crimping on the core and insulation), position the tip correctly in the dies of the crimping jaws so that each circuit crimps the corresponding part of the wire. The tip should start on the marked side of the dies. Orient the tip so that the process seam of the cylindrical part is on top. Use color coding or die number to identify the crimp profile for the selected tip size.
7 Twist the tip correctly. Pressing must be carried out until the dies of the pressing tongs are completely closed. After crimping, check the integrity of the insulating sleeve and the mechanical strength of the connection. There should be no movement of the wire in the tip.