Marking of paths for electrical wiring and places for installation of fixtures
 Marking is a responsible type of electrical work. Marking is done in a certain sequence. They first study the drawings of the work project, then they examine the place where the work will be carried out, compare it with the drawings and pay attention to the creation of a safe working environment.
Prepare the necessary tools, fixtures and materials. Determine the places for installing electrical equipment and inputs, mark places for sockets, holes, niches, installation of built-in parts for fixing electrical equipment.
Working drawings show the distance from the floor, ceiling, columns, trusses or other structural elements of buildings and structures.
Geodetic height markers are also used when marking. After determining the places for installation of electrical equipment, the wiring routes are marked.
Routes of open electrical wiring are applied with colored marking cable parallel to the walls and ceilings, taking into account the architectural lines of the premises and structures. Connection points, forks, holes, passages, bypasses, anchorages are marked on the routes. Anchor points start marking from the end points and end with intermediate points.
The routes of hidden electric wires on the floors are marked along the shortest distances, and on the walls - strictly vertically or horizontally.
Implementation of marking of the routes of wires and cables
Marking is done with chalk, an ordinary soft pencil, charcoal or a pen. Lines are applied using special devices or cord rubbed with powdered chalk, charcoal or blue color.
The points of attachment of the lines for marking the routes and axes are marked with transverse lines, which must be visible when creating holes and mounting. Through holes, sockets, channels are marked indicating their outline (circle, square, rectangle) and dimensions.
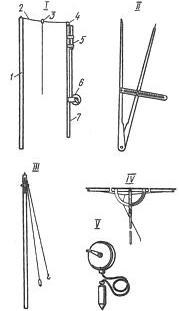
Rice. 1. Marking of attachment points and routes for laying electrical wires different tools
The most convenient tools and devices allow an electrician to carry out marking work from the floor without climbing to a height. The ceiling marking is made with two posts (/).
The marking cable 2 is attached to the end of a long pole / and is wound on a drum 6 through a roller 4 and a camera 5 with a colorant attached to a short pole 7. A long (3.4-3.5 m) pole 1 is securely mounted in a spacer between the floor and the desired point on the ceiling, move away with a short pole 7 in a certain place and pull the cable 2 above the surface of the ceiling.
Then, with a twine tied to a ring 3, which easily moves along the colored cord 2, the rope is pulled back and abruptly released, breaking the line. Mark the anchor points of the dashed line with a compass (//).
Using a plumb post (///) they transfer the points marked on the floor to the ceiling and with a string frame (IV) they mark the lines on the walls and ceilings in a manner similar to the two-pole technique. A plumb line in the shape of a tape measure (V) is also convenient for marking.
Rice. 2. Marking with marking cord (plumb with cable)
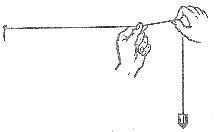
In the absence of special marking devices, the electrician does the work himself. Attaches one end of the marking line (plumb) to the surface to be marked, paints the line with dye, pulls it with one hand, and with the other pulls it away from the surface and releases it. The cord hits the surface and leaves a clear stain of the dye .
Layout of places for installation of lighting fixtures
The markings must ensure the correct positioning of the lighting fixtures in the row and height without visible deviations. On surfaces with molded sockets, lamps are installed in accordance with the requirements of the project. In the absence of instructions in the project, the marking must ensure that the lighting fixtures are installed so that the light flux is directed vertically downwards.
Rice. 3. Marking the place of installation of one lamp
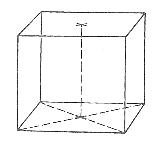
You should mark two diagonal lines. Mark the point of intersection of the diagonals and move it from the floor to the ceiling with a pole with a plumb line, for which the top of the pole must be installed on the ceiling so that the plumb line is just above the point of intersection of the diagonal lines of the floor.
Rice. 4. Marking the places for installation of two lamps
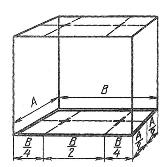
Mark the center line along the center of the room and mark points on it located at a distance B / 4 from the transverse walls. Transfer the two marked points to the ceiling with a plumb line. Mark with a ruler frame or two string posts in the specified sequence directly on the ceiling.
Rice. 5. Marking the places for mounting four lamps
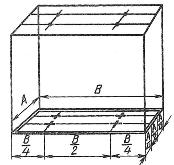
Mark two lines on the floor parallel to the longitudinal walls at a distance A / 4. Mark four points on the lines at a distance B / 4 from the transverse walls and transfer to the ceiling with a plumb line. Perform marking in the same way as marking two lamps.
Rice. 6. Marking the places for installing several lamps in a checkerboard pattern
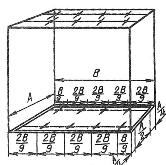
Mark two lines on the floor parallel to the longitudinal walls at a distance of A / 4. Mark points on one line: the first at a distance of B / 9, the rest at every 2B / 9. Repeat the marking of the other line in the same order, starting to count only from the opposite transverse wall. Do this marking in the same way as marking four light fixtures.